

 Member
 Chad
MemberForum Replies Created
-
We can offer only the Whites, light grey, and dark grey as shown via our website. Custom colors are not available as matching to custom color codes can be very difficult and slows production speed considerably. Past customers wishing to spray a custom color will usually just order the project with the PRIMER ONLY option selected. This allows you to install the cabinets raw, then have the doors sprayed by a local painting professional of your choosing. Our primer is universal and very nice for spraying a paint formula of your choosing on site.
-
-
We do not list banding for sale on barkerdoor.com. Our banding is not the type that can be easily applied in the field by the customer. Our banding is fleece backed and can only be applied using an industrial edge bander using hot melted glue. Amazon sells most any type of edge banding that can be ordered in either adhesive backed (peel and stick) or even the iron on version that uses a regular clothing iron.
Example of the cherry banding:
-
This reply was modified 1 year, 8 months ago by
Chad.
-
This reply was modified 1 year, 8 months ago by
-
Cabinets will have exposed construction holes visible on the sides after you have assembled the cabinets. They are not finished with a material that matches the face of the cabinet. This allows for super strong confirmat screw assembly as well as not having to waste a valuable/expensive veneer when you place cabinets side by side. If you have an exposed cabinet side after installation, a finished end panels should be ordered.
https://www.barkercabinets.com/Kitchen-Wall-Finished-End-Panels-s/97.htm
Legacy attachments:
-
This reply was modified 1 year, 8 months ago by
-
This reply was modified 1 year, 8 months ago by
-
Our clearcoat is a conversion varnish (solvent based) finish that is not available to the general public. It is an industrial finish that must be sprayed using ventilators in a heated spray booth environment.
To get a close match to our product, using a clear satin Minwax poly is a very durable finish that can be easily applied on site and wil match up rather well.
Legacy attachments:
-
The KV slides are side mounted. They can be attached on the inside edges of the cabinet, or you can use the face frame mounting brackets along with some rear mounting brackets at the back of the cabinet. This eliminates the need to flush out the cabinet sides using wooden blocks or build out strips.
For the depth, sounds like you have an actual interior cabinet depth of 20.75″. I would add a 3/4″ cleat on the back of the cabinet to ensure there is enough support to hold the drawer weight. That gives you 20″ of depth to work with. 18″ would be the best option for the depth of the slides and the drawer box in this situation.
https://www.barkerdoor.com/KV-drawer-guides-and-slides-s/113.htm
https://www.barkerdoor.com/Face-Frame-Mounting-Bracket-for-KV-8400-pair-p/kv-8404-(pair-of-2).htm
https://www.barkerdoor.com/Rear-Mounting-Bracket-for-KV-8400-pair-p/kv%208403%20(pair%20of%202).htm
-
Sure, see the image below.
For the base portion of the entertainment center, you would typically start with a row of base cabinets with finished ends. I would prefer to have a flush toe kick and then attach some base molding to the face to give it a properly finished look.
The issue lies with the upper portion. Ideally, the best-looking entertainment centers have a face frame that defines the TV opening and creates dedicated spaces for speakers. However, our construction method does not use a face frame, so this isn’t something we can offer. We do have exposed wall cabinets, but the material used there is only 3/4″ thick, which I feel is too thin for this application.
That said, we recently began offering 1.5″ thick plywood end panels, which match the thickness of a face frame and would work well for an exposed shelf system. We also have a lot of extra fall-off material, so I need to find a way to make use of it.
Give me a few days to review some options. Worst case, we could supply a finished end panel style that could be used to construct the open shelving above the base cabinets. This would allow you to order the parts as needed and simply glue them together on-site.
Legacy attachments:
-
Yes, our standard is 5/8″ proud for the end panels on all door styles. It’s not to make the edge flush to the face of the doors, its more to have a slight step back of 1/8″ or more to ensure your eye is not drawn to door hinge adjustments to get the door to close flat against the cabinet case. See here for visuals:
Legacy attachments:
-
Chad
AdministratorFebruary 6, 2025 at 2:40 pm in reply to: finished end panels used with Island designSounds like you are on the correct path. I prefer to hold the end panels up by 4″ and use a toe skin to cover the exposed toe kick. Alternatively, you can, and should, use the base molding if you plan to have the FLUSH toe kick on the base cabinet with accessible door. The difference between the toe skins and base molding, is that the toe skins have an exposed core on the top/bottom edges. Base moldings have a finished top edge which is needed for when you open the base cabinet door and see the top of the base molding.
That said, I would recommend using the recessed toe kick instead of the FLUSH toe kick on the face of the island. If you go flush, it is fine, but you will certainly be knocking into the face of the base board if you ever use that area as a working surface. The toe kick 3″ recess is invaluable IMO.
Here is a recent diagram I put together showing how to order end panels and wrap the toe kick area correctly.
-
Chad
AdministratorFebruary 5, 2025 at 2:20 pm in reply to: Base cabinet for different size cooktop and rangeSince you’re using an induction cooktop, it can typically extend into adjacent cabinets because it’s very shallow and usually only requires a cut into the countertop, not the cabinet tops. While some models may have electrical components in the middle, this depends on the design and is fairly common. In this case, you would simply build your base cabinet around the 24″ wide wall oven, leaving 16″ of extra space from the original 42″ gap. You can fill this space with any base cabinet configuration that maximizes storage and versatility.
See the attached images. i included an example of how we would build a simple base cabinet to hold a 24″ wide oven. This is not standard and the sizes will certainly change based on changes to the model you plan to use.
Legacy attachments:
-
Chad
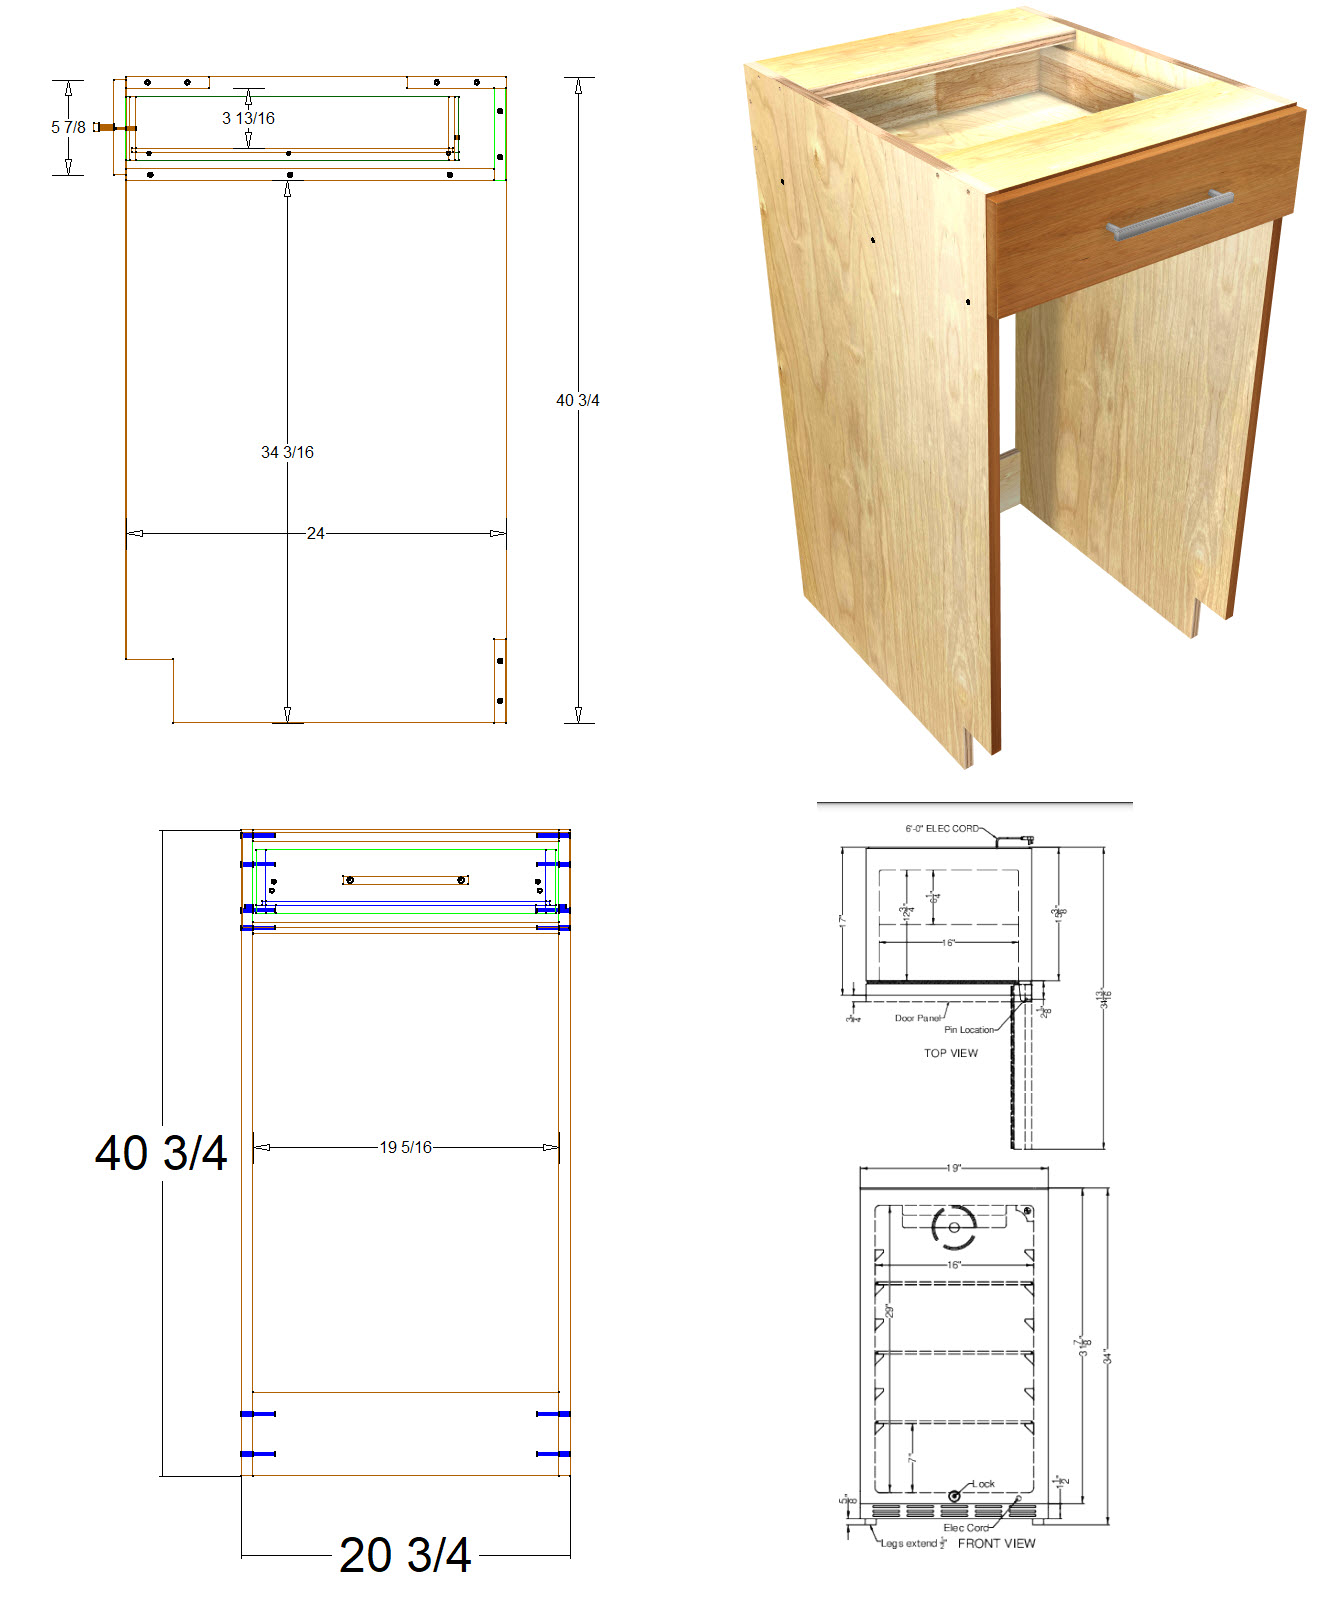
AdministratorFebruary 4, 2025 at 10:11 am in reply to: Does an appliance case top drawer match 1D bases?Sure, so when using this cabinet, you will have a 5 7/8″ tall top drawer front as a standard. T his top drawer front height is standard as it will align with other top drawer fronts.
https://www.barkercabinets.com/Base-1-Drawer-Appliance-Case-p/b1drappliancecasetall.htmLooks like that ref is 34″ tall, so I would suggest ordering that cabinet at 40.75″ tall to ensure you have a bit of extra space in the opening height.
Legacy attachments:
-
This reply was modified 1 year, 8 months ago by
-
This reply was modified 1 year, 8 months ago by
-
Chad
AdministratorFebruary 4, 2025 at 10:02 am in reply to: Clearance for Under-Counter/Bar SupportsEasiest way to achieve clearance would be to simply order the cabinets slightly lower in height, then fill in the gaps using a trim molding or wood blocking in between the supports. Our cabinets do not have a face frame, so it is not possible to make for a wide rail on the top of the cabinets as your photo shows.
-
The Dover is a bit warmer of a color and has its own edge banding separate from the Pure. They are close in color, but we still change the banding so it has an exact color match.
-
Sure, see the attached photos here. First is the new Chestnut edge banding showing the grain and color matching. The PVC tape is much more durable than a stained real wood and looks and feels virtually identical to the real thing. Same for the Pure and Dover Whites.
-
I checked, and the absolute minimum frame width we can offer for a frame-and-panel door is about 1 7/8″. This allows for hinge cups at the proper depth while ensuring the door remains strong enough to prevent breakage over time. At this smaller width, there may be slight warping or bowing on taller doors, but it would be minimal.
To match your reference door exactly, we would need to start with a 3/4″ thick slab plywood door and add an outside edge detail molding. The frame width in your picture appears to be 7/8″ to 1″, which is too narrow to be constructed using a traditional frame-and-panel method.
The difficulty arises from the need for a 3/4″ thick substrate to support the hinges. Since the hinge cup must be drilled just over 1/2″ deep, there must be enough material thickness to avoid drilling through the door face. Adding outside molding to mimic the 7/8″ frame width is possible, but the door would then need to be at least 7/8″ to 15/16″ thick to maintain a proper frame-to-panel distance.
At 7/8″ thick edges, our standard 1/8″ reveals between doors would cause interference. When opened, the doors would rub against adjacent ones. Reducing the door thickness isn’t an option either, as it would prevent drilling the hinge cup to the required depth.
Additionally, Blum soft-close hinges require an integrated mechanism inside the hinge cup. If the door is too thin, we’d have to switch to non-soft-close hinges, which require a different drilling pattern. Other cabinet lines get around this by increasing door gaps to 1/4″ or more, but this results in a less refined construction method.
Ultimately, this skinny door style would require significant handwork to apply the outside molding and would be too thick for standard hinges. It’s probably not the best fit for our product line, as the price, durability, and production efficiency would suffer. This design introduces complications that could slow down production and create inconsistencies in quality.
Legacy attachments:
