Recent › Forums › BARKER CABINETS › Sink Wall Design Clarifications
- This topic has 9 replies, 2 voices, and was last updated 8 hours, 55 minutes ago by
djd.
-
AuthorPosts
-
-
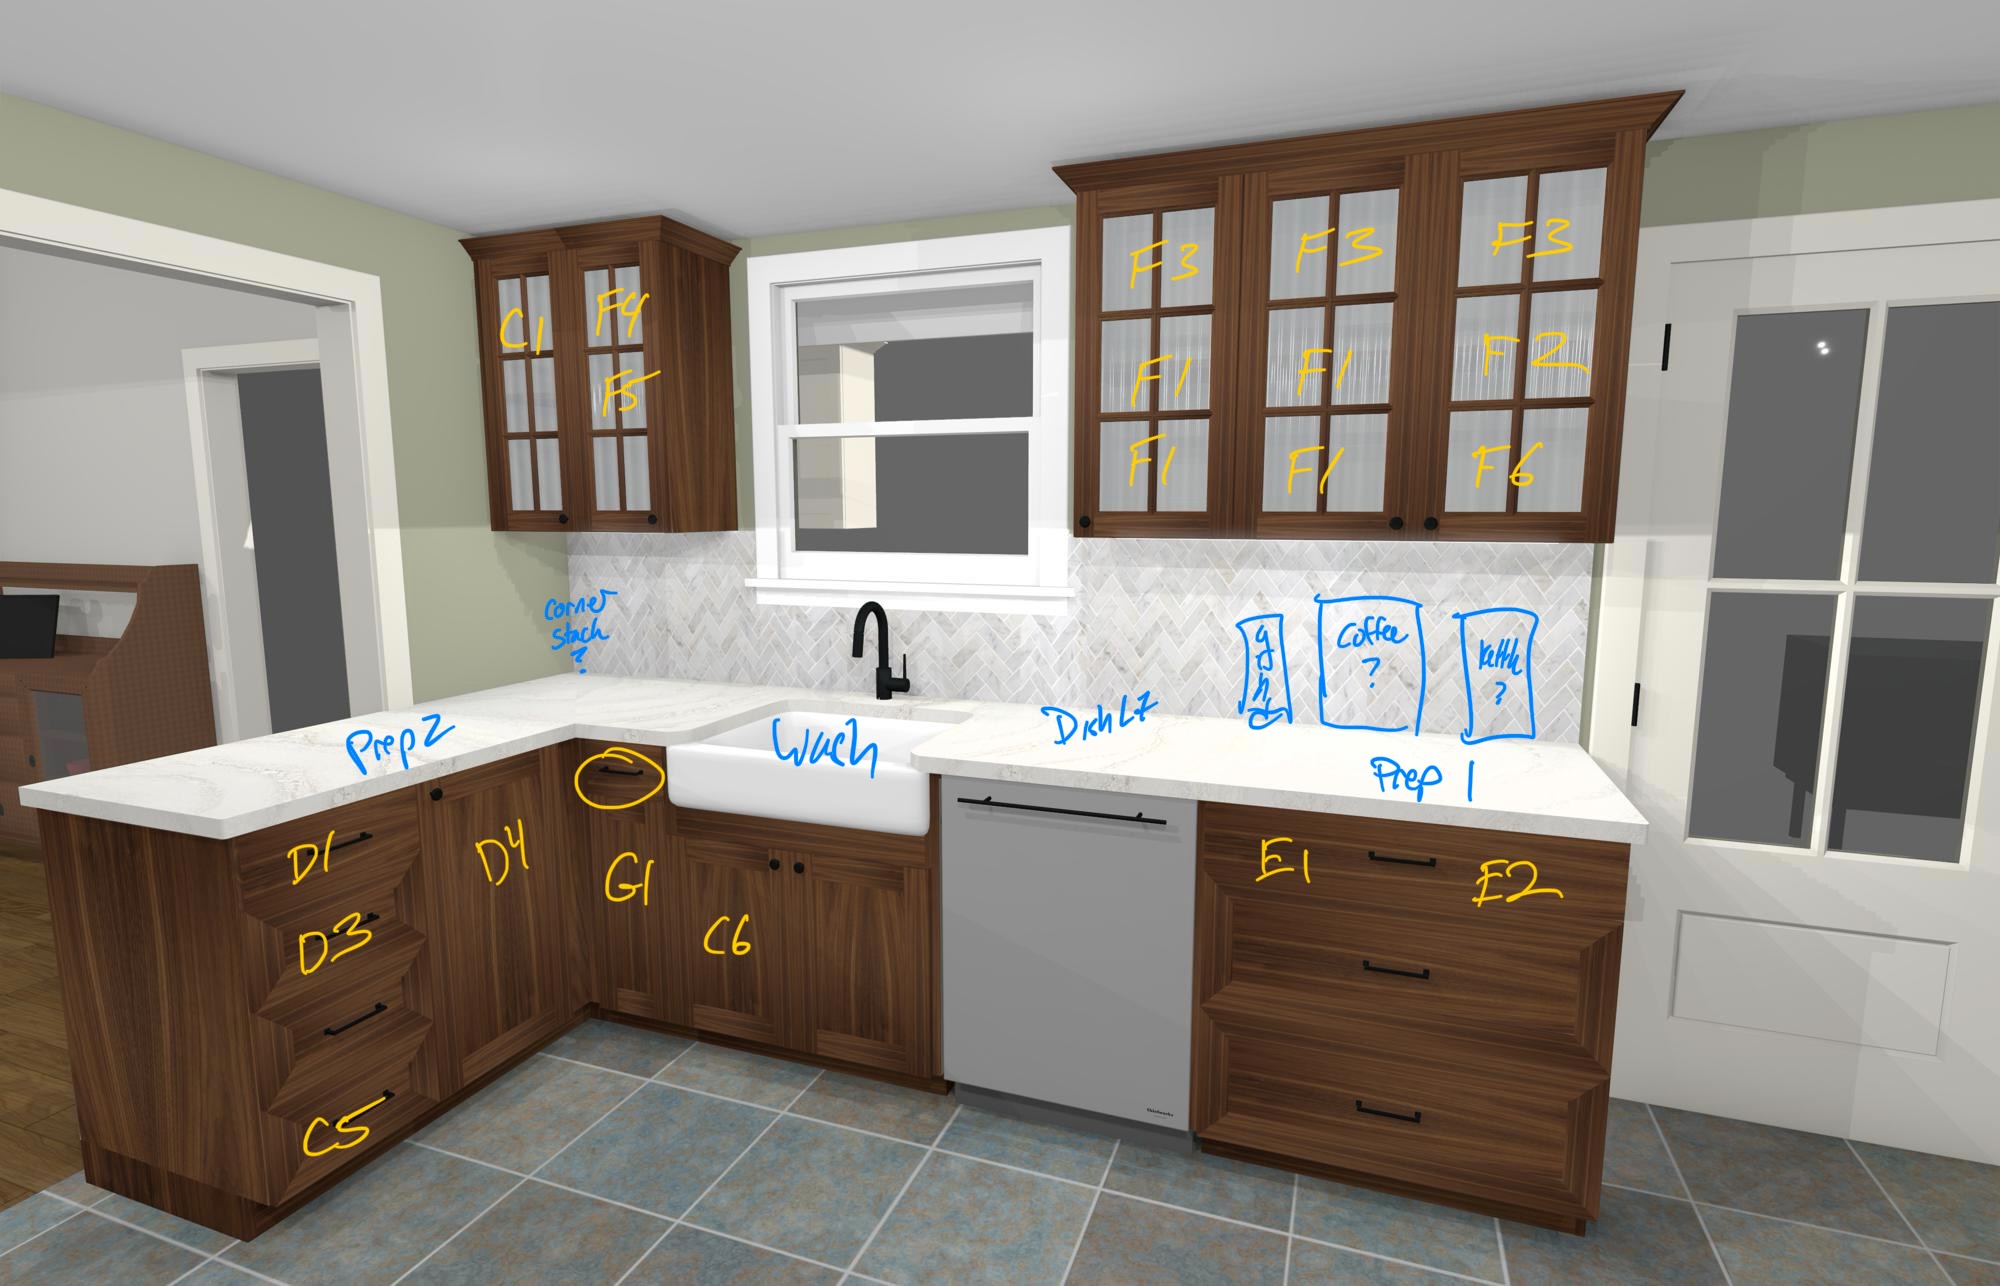
Post 3 of 3. This is the most complicated end so hope it makes sense. Thanks again.
Again some context:
– Sink wall 26″ deep cabinets, 27″ deep counter, 14″ deep wall
– Peninsula 24″ deep cabinets because this actually will back to a framed wall behind it. See pic looking in from dining room. We plan to remove the short section at end of peninsula.1. Lower Corner B1DBLINDRIGHTV2:
1a. Since the peninsula and wall depths are different would like to check measurements. Width 46″, depth 24″, blind ??? (was thinking 26″ but product page seems to suggest it should be larger – maybe 27-28″?). Would like to leave >=18.5″ wide door opening for 1b.
1b. Are the shelves removable? I am thinking to add an 18″ Lemans II pull out.
1c. Are any spacers/fillers required between this and the next unit to the right (heading toward sink)?
2. Upper Corner W90:
2a. Again, checking dimensions due to the deeper base. 26″ width and depth. Better for return to be 12″ or 14″ or split diff 13″?
2b. Is the door possible with glass as well or not because of bifold hinge?
2c. Better to hinge on right (as shown) and open to window, or possibly reverse to open towards peninsula?
3. Glass: Is there a spec somewhere for how these grooves are cut for single panel vs 4 or 6 lites? Would like to start talking to glass providers.
4. Does Dishwasher require an appliance case, or no since there are already cabinets on both ends? Any additional spacers or FE’s needed in between it and cabinets on the side?
5. For the BFE’s. Is running down to the floor vs to the top of toe kick simply an aesthetic choice? Seems to floor would avoid the seam but also could become a toe stubber!
6. Any other watch outs or things I’m missing.Hopefully that is it Chad. Thanks again.
Once my door sample arrives and I sort these i’s and t’s I should be good to go.Attachments:
-
Meant to include view from dining room. This lower framed wall will back to peninsula with counter extending across the top of both.
Attachments:
-
1a. Blind Corner Cabinet Depth
If the sink cabinet and the cabinet to the left of the sink are both 26″ deep, then the blind depth on the blind corner cabinet must also be ordered at exactly 26″. The blind dimension should always match the depth of the adjacent cabinet, in this case the sink cabinet, as shown in your drawing.
1b. Adjustable Shelf Removal in Blind Corner Cabinet
Possibly. It depends on the size of the cabinet opening and the blind dimension. I cannot say for certain without physically building the cabinet and attempting to remove the shelf. If the opening is too small relative to the shelf size, the interior adjustable shelf may not be removable after installation.
1c. Built-In Fillers on Blind Corner Cabinet
Blind corner cabinets include built-in fillers. Specifically, the cabinet you are using appears to be this one:
https://www.barkercabinets.com/product-p/b1dblindcornerrightv2.htmThis cabinet includes built-in fillers that extend from the face of the cabinet to create a clean and seamless transition into the adjacent cabinet run. Please refer to the top-view images on the product page for clarification.
2a. Bi-Fold Glass Door Availability
We do not offer a bi-fold glass version of that cabinet. The bi-fold hinges would be visible behind the glass panel, which would negatively affect the appearance. To prevent aesthetic issues and unmet expectations, this configuration is not offered.
2b. Glass Door Hinge Visibility
Same as above. Unless the glass is highly opaque, the hinges will be visible behind the glass panel.
3. Glass Installation Information
For glass installation details, including how the back of the door is prepared and how glass is installed, please see this video guide:
https://www.barkercabinets.com/cut-and-install-cabinet-glass-s/355.htmYou may also choose to have a local glass company cut and install the glass for best results.
4. Dishwasher Appliance Case Requirement
In your situation, the dishwasher does not require an appliance case. Appliance cases are typically only needed when the dishwasher is located at the end of a cabinet run or in situations where additional countertop support is required.
5. Full-Height End Panels vs. Toe Kick Clearance
Based on experience, I strongly recommend holding the finished end panels up 4″ and allowing the toe kick to run underneath, rather than running the panel all the way to the floor.
There are several advantages to this approach:
Easier cleaning access
Reduced risk of toe stubbing
Less long-term damage from foot traffic and cleaning equipment
Improved durability and appearance over time
Full-height panels that sit directly on the floor tend to get damaged more easily and are less practical in everyday use.
6. Overall Review
Everything else looks good.
-
Test. Replied 10′ ago but doesn’t seem to be showing up here.
-
Weird. Comment #4140 seems to have not made it. Trying again:
1. Blind Base Corner
– Sounds like the shelves may not be removable AFTER construction but also they are NOT required? I could just build it without those and install a Lemans II instead?
– Alternatively, I could go with B1D1DRMAGICCORNERRIGHTV2 and your integrated Hafel Magic Corner. Can you confirm the front door/drawer dimensions if I went with 46″ overall width and 26″ blind? Assume would be 46 – 26 – ~3″ filler = ~17″ door and ~15.5″ opening? I would like to match this face to the drawer stack at left of peninsula.2. Upper Corner
Checking dimensions due to the deeper base. Planned 26″ width and depth. Would return be better as 12″ or 14″? or possibly split the diff and make it 13″?3. Glass video is great. You are everywhere! Do you have a recommended glass thickness to fit the routed edge and slots? I am looking at some patterned/textured options and don’t want to end up too thick.
Everything else super clear. Thanks again. Really look forward to getting this cabinet order in as it is rate limiting step!
Cheers
-
One more thought re Upper Corner.
Would it be possible to do 2 independently opening doors that open outward from the corner to enable the glass and consistency with right of sink?
Worst case, would basically be your W90EXPOSED cabinets + 2 separate doors + I need to work out the appropriate hinges with my contractor.
Attachments:
-
1. Correct, the adjustable shelf inside the blind corner cabinets is not required. You can simply not install it if you wish.
Sure, see the attached image for a top view of this cabinet at 46″ wide with the 26″ blind. https://www.barkercabinets.com/product-p/b1dblindcornerrightv2.htm2. 12″ to 14″ will all work. I prefer 13″ for wall cabinet depths because it accommodates larger-diameter plates without them contacting the back of the doors. However, either of these side returns will work fine.
3. 3/16″ thick glass is what I used in the video, and it was easy to work with. It was sourced from the local Home Depot, so it should still be readily available. If you cut into the radiused notches in the back, you can use thicker glass, as some textured glass materials can be up to 1/4″ thick.
The upper corner configuration shown in your picture is not something we offer. The issue is that one door cannot open fully because it will hit the knob on the opposing door. This means you would have to open the knobbed door first, and then manually pull open the other door without a knob. If you look closely at your picture, the right-side door does not have a knob for this reason.
It may function a bit awkwardly, but I understand the appeal. Some of the wider 90-degree wall corner cabinets can have issues with bi-fold doors sagging over time, which is why we limit the sizes of those cabinets on our website.
Overall, if we offered the version shown in your picture, it would likely lead to customer complaints about the functionality of the design.
Attachments:
-
Still dotting i’s over here, Chad.
Re the 3 Drawer stack on far right. Planned this at 31″ wide and 26″ deep which is a BIG drawer (~29″ x 24″).
Is 1/4″ plywood base sufficient? -
A 29 inch drawer is very common as far as width is concerned. I personally have 36 inch wide drawers in my island loaded with cast iron pans and have had no issues using 1/4 inch thick drawer bottoms.
What people need to understand is that you can always add reinforcement to the bottom if needed. After installation, you can inlay another 1/4 inch or thicker panel into the bottom of the drawer box if you want additional strength.
The reason drawers are not built with bottoms thicker than 1/4 inch is due to the dovetail construction. Anything over 1/4 inch requires a deeper dado, which will cut into the dovetail joint in a way that can show through as a visible gap or void once the drawer is assembled. If someone is offering a 1/2 inch drawer bottom, they are typically notching the bottom to fit a 1/4 inch dado, modifying the dovetail joint to something non standard, or adding an additional panel after the drawer has already been assembled.
A better option for heavy cast iron storage is to add a 1/4 inch to 1/2 inch rubber or vinyl liner to the bottom of the drawer. This is not so much for rigidity, since 1/4 inch bottoms are more than sufficient and I have never had one reported as damaged, but to protect the finish. Cast iron can scratch the bottom surface, and any residual moisture from a pan that was not fully dried can cause rust stains. Those stains are difficult to remove and the drawer bottom is not easy to replace.
I have kids, and they do not always dry everything perfectly after dinner. Adding durability where you can helps prevent unnecessary frustration later.
-
Perfect. You continue to fill me with confidence. 🙂
One more Q on the sink side as I am laying things out.
What are your thoughts on increasing the drawer height on B1D1DR? I’m thinking dishtowels in the circled drawer to left of sink, and cutting boards below. Deeper drawer would make it more usable and bring lower door in line with the under sink doors.
Possibly weird alignment with the top row drawer handles though so not sure it’s worth it.
Attachments:
-
-
AuthorPosts